
 |
 |
 |
 |
 |
 |
 |
|
|
LEGO® is a trademark of
the LEGO Group of companies, which does not sponsor, authorize, or endorse this site. |
Railroad Level Crossing
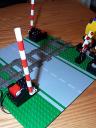 The 1x4 dual light element was what started it all. I owned a few of them and I really liked
the way the lights alternate when the polarity is reversed. It made me think of the signal lights
that warn motorists of approaching trains at railroad level crossings. Since NELUG was about to
have our very first train show, I built a signal light
to bring along.
The 1x4 dual light element was what started it all. I owned a few of them and I really liked
the way the lights alternate when the polarity is reversed. It made me think of the signal lights
that warn motorists of approaching trains at railroad level crossings. Since NELUG was about to
have our very first train show, I built a signal light
to bring along.
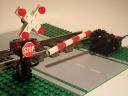
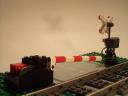
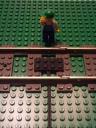
Now, beside every signal light there is usually a gate to block traffic. The UFO set that I got my 1x4 light elements in also included a 9V micromotor, so I decided to build a gate as well. I was very pleased with both the realism and functionality of these two MOCs, especially considering the short timeframe it took to design and build them. When I brought them to the show, I had rigged them up with a battery box and a polarity switch to enable the crossing to be operated manually. It made for a great demo, but nobody (myself included) was about to sit there for eight hours operating that crossing, so it sat idle and dark for that first day. I went home that night and an idea that I'd had (and forgotten) several months earlier came rushing back to me: Create a touch sensor for the RCX that uses a magnetic reed switch. This type of switch is "pressed" by any nearby magnetic field such as that provided by the magnetic couplers used on LEGO trains. Snip, solder, dremel, glue, and add a few lines of NQC. The next day I arrived at the train show with an RCX to detect oncoming trains and operate the crossing automatically. As with so many LEGO projects that I've attempted, it worked out a lot better and a lot easier than it had any right to. These crossings have been a fixture on every NELUG train layout since. I've had as many as five RCXes on a layout at one time, and I've added features to the NQC program such as field-reprogrammable gate timing to handle some of the situations I've come across doing train shows. The latest incarnation uses the Control Lab PC Interface and a Windows application that I wrote to run up to four crossings with the ability to add extra crossings using RCXes and an IR tower. The program displays the Track Designer bitmap of the train layout and overlays its own graphics to show the state of the train sensors and crossings at all times. I am planning to make this software available as FREEware, so watch the Download page for updated information about TrainLab. You will also be able to download my NQC program for running a single crossing there as well. My No Touch train sensor will soon be available in the Gift Shop, so please consider supporting this site by purchasing sensors for your train automation project here. |
|
Copyright (c) 2003 by Christopher Phillips. All Rights Reserved.
LEGO® is a trademark of the LEGO Group of companies, which does not sponsor, authorize, or endorse this site.